Turn your website / html into a mobile App for Android and iOS
By WebIntoApp.com | Updated on the on the 11/01/2023 | Related to Free and Dedicated Apps |
This tutorial will guide you how to convert a website, or html files (with js and css) into a free or a dedicated App for Android and iOS with the App Maker of the WebIntoApp.
The App Maker is a wizard tool that allows everyone, even those that do not have technical knowledgement, to convert an existing website (online URL) and HTML / JS / CSS files (offline App) into a stand-alone Mobile App for Android and iOS.
You can either create a new App, or edit / add / remove features from an existing App with the App Maker.
The App Maker contains two main stages. The first stage allows you to set the App details, such as the App name, the version, the description, the extra features and more, while in the second stage you can set the mode of the App (free or dedicated), then compile and build it according to the details that you have set in stage one.
Let's create a new simple App while covering the main features of the App Maker.
Stage 1 - Set the general details of your App
-
Set the source of your App
The source of your App can be an online website (URL) or HTML / JS / CSS files under a zip file.
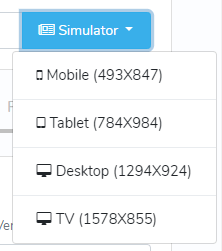
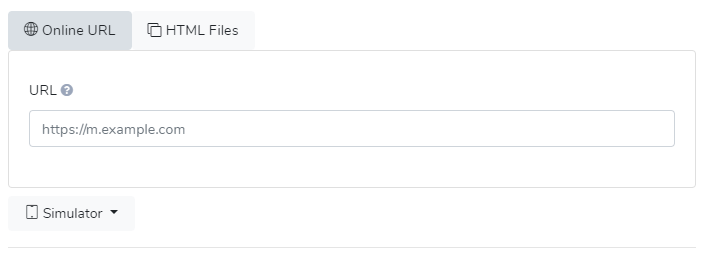 You can use the Simulator in order to review the estimated look of your App in the device. Currently the simulator works with Online URLs only.HTML FilesMake sure the HTML/CSS/JS files are under the main directory of the ZIP file, while the index.html file is the entry point of your App.Please note that HTML App (with JS and CSS) that can be run locally should work fine inside the webview of your App. Server-side technologies and languages, such as PHP (or MYSQL) will not work.
-
Set the App details
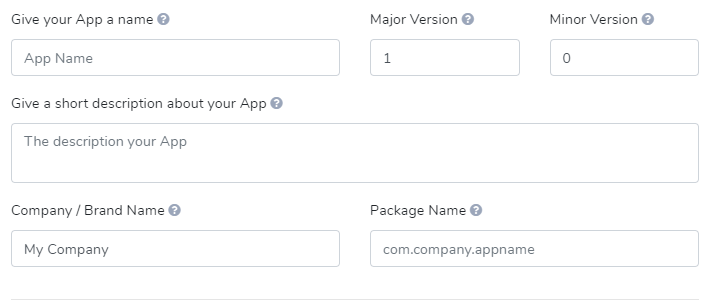
- Give your App a name.
- Set the Major Version and the Minor Version of your App.
- Describe the App.
- Set your company / organization name.
- Set the package name.
The package name should be a unique name to identify a specific App. e.g. com.yourcompany.appname
The App Maker will create the package name automatically from the App Name field and the Company Name field.
Please Note:
If your App uses the Firebase services, please make sure that the package name of the Firebase App and the package name of your App are the same. If you will not set the Firebase Package name as the Package name of your App, the App Maker will change the Package name of your App to the Package name of the Firebase App automatically.
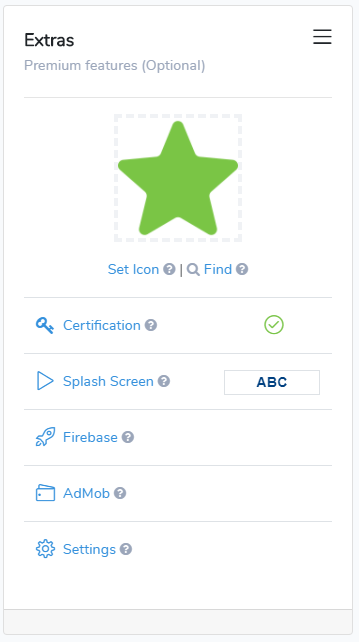
Set the Extras / Premium features of your App (Optional)
The Extras section of the App Maker allows you to set the advanced features of your App, such as the Icon, Splash Screen, Firebase, AdMob and Advanced Settings.
-
Set the icon of your App.
Click on the Set Icon link in order to Upload the icon of your App. The system will generate the relevant icons and fit them to the right resolutions according to the Android and iOS requirements.Only 512x512, 256x256, 128x128 64x64 PNG icon files are allowed (higher is better).You can find great icons at:
https://www.flaticon.com/ -
Set the Certification / Ownership of your App (Optional).
A public-key certificate, also known as a digital certificate or an identity certificate, contains the public key of a public/private key pair, as well as some other metadata identifying the owner of your App (for example, name and location).The Auto-Fill button will automatically fill the relevant fields for your App.The system will use the Auto-Fill functionality when you are creating a new App so you do not have to deal with these fields, but if you still want to set other details, you can fill those fields as you wish.You can set the defaults values of those fields in the Settings->Defaults, so each time you are creating a new App those fields will filled up automatically. -
Set the Splash Screen
The splash screen is the entry point of your App. You can set it as a Default, Image and None. -
Set the Firebase
The Google Firebase allows you to push notifications (Firebase Cloud Messaging) to your App users and get the the usage statistics (Firebase Analytics) of your App. Tutorial -
Set the AdMob
The Google AdMob is a mobile advertising platform that you can use to generate revenue from your app. your App. Tutorial -
Settings
The Settings allows you to set the look and the behavior of your App, such as the screen orientation, the behavior of the webview and more. You can hover the question mark near to the selected setting in order to get more details about the option.
Now that you have set the details of your App, you can click on the Next button in order to move to the next stage.
Stage 2 - Set the mode and build your App
In the second stage you can set the mode (free or dedicated) then compile and build your App according to the details that you have set in stage one.
-
Set the mode of your App.
You can create a free app or a dedicated App. Here are the main points for each mode:-
Free App
Android App (APK file) under released mode with our advertisement for free usage. -
Dedicated App
Your own dedicated, white label and branded Mobile App for Android and iOS* with all the premium features and the source code for free or commercial usage.
-
Free App
-
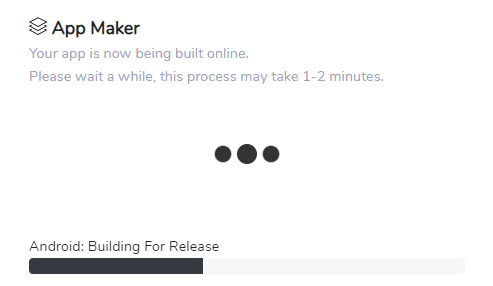
Compile and create your App.
Click on the Make App button.

The App Maker will display a window with the building progress of your App. Please wait a while, this process may take up to 1-2 minute.
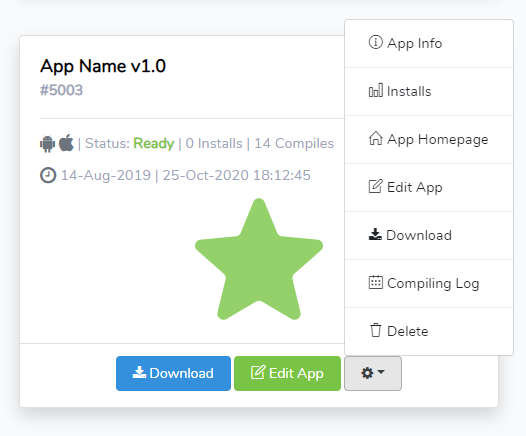
Your App is ready.
You can now download your App, publish it everywhere, and use all the features the WebIntoApp.com provides, such as detecting new installs (detailed with many parameters), push notifications with the Firebase Cloud Messaging service and even earn money with AdMobe.
In next guides you will learn how to use the Firebase, add an AdMob banner and open the source code of your App then run it locally.
Related Links: